

React NavigationをTypescriptと一緒に使う際につまづいたところ


最近業務でReact Nativeを書いているのですが、ナビゲーションのライブラリとして
React NavigationをTypescriptと一緒に使う際に色々大変だったので(主にドキュメントを読んでいないせい)
まとめておこうと思いこの記事を書いています。質問や気になる点があれば@kmgk21444557までご連絡ください。
アプリの作成、実行にはExpoを使っています。
サンプルアプリのリポジトリ:https://github.com/kmgk/ReactNavigationExample
環境
node: v16.10.0
yarn: 1.22.4
expo-cli: 4.12.1
OS: android (Pixel 3a XL API R)
package.json
{
  "dependencies": {
    "@react-navigation/bottom-tabs": "^6.0.7",
    "@react-navigation/native-stack": "^6.2.2",
    "expo": "~42.0.1",
    "expo-status-bar": "~1.0.4",
    "react": "16.13.1",
    "react-dom": "16.13.1",
    "react-native": "https://github.com/expo/react-native/archive/sdk-42.0.0.tar.gz",
    "react-native-safe-area-context": "3.2.0",
    "react-native-screens": "~3.4.0",
    "react-native-web": "~0.13.12"
  },
  "devDependencies": {
    "@babel/core": "^7.9.0",
    "@react-navigation/native": "^6.0.4",
    "@types/react": "~16.9.35",
    "@types/react-native": "~0.63.2",
    "typescript": "~4.0.0"
  },
}
テスト用アプリの作成
expo-cliを用いてアプリを作成します。テンプレートはblank (Typescript)を選択しました。
$ expo init ReactNavigationExample
必要なパッケージをインストール
yarn add @react-navigation/native @react-navigation/native-stack @react-navigation/bottom-tabs
expo install react-native-screens react-native-safe-area-context react-native-pager-view
Hello React Navigationを参考に、
HomeScreenとHogeScreenの2画面作成し、createNativeStackNavigatorでナビゲーションを作成します。
App.tsx
import { NavigationContainer, useNavigation } from '@react-navigation/native';
import { createNativeStackNavigator } from '@react-navigation/native-stack';
import React from 'react';
import { Button, StyleSheet, Text, View } from 'react-native';
const HomeStack = createNativeStackNavigator();
export default function App() {
  return (
    <NavigationContainer>
      <HomeStack.Navigator initialRouteName="Home">
        <HomeStack.Screen
          name="Home"
          component={HomeScreen}
        />
        <HomeStack.Screen
          name="Hoge"
          component={HogeScreen}
        />
      </HomeStack.Navigator>
    </NavigationContainer>
  );
}
const HomeScreen: React.FC = () => {
  const navigation = useNavigation()
  return (
    <View style={styles.container}>
      <Text>HomeScreen</Text>
      <Button
        title="Go To HogeScreen"
        onPress={() => navigation.navigate('Hoge')}
      />
    </View>
  )
}
const HogeScreen: React.FC = () => {
  return (
    <View style={styles.container}>
      <Text>HogeScreen</Text>
    </View>
  )
}
const styles = StyleSheet.create({
  ...
});
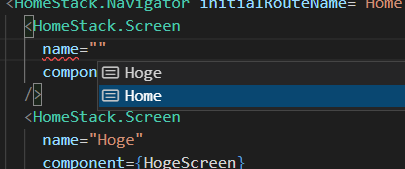
navigate('Hoge')でエラーが出る
まずここでエラーが出ます。onPress={() => navigation.navigate('Hoge')}のnavigateの引数である文字列Hogeの型が正しくないようです。
型 'string' の引数を型 '{ key: string; params?: undefined; merge?: boolean | undefined; } |
{ name: never; key?: string | undefined; params: never; merge?: boolean | undefined; }'
のパラメーターに割り当てることはできません
'Hoge'が割り当てられる予定のnameパラメータの型がneverになっています。なんで。
ここで公式にType checking with TypeScriptというページがあることに気が付きます。
To type check our route name and params, the first thing we need to do is to create an object type with mappings for route name to the params of the route. For example, say we have a route called Profile in our root navigator which should have a param userId:
とあるのでとりあえずルートをまとめたオブジェクトRootStackParamListを作成します。
type RootStackParamList = {
  Home: undefined;
  Hoge: undefined;
}
型にundefinedを指定するとナビゲーションからパラメータを与えられません。逆にパラメータが欲しい場合はそのパラメータのマッピングを指定する必要があります。
これをcreateNativeStackNavigatorに指定します。
const HomeStack = createNativeStackNavigator<RootStackParamList>();
こうすることでNavigator内部のScreenでnameが制限されます。
定義したルート名しか使えないのでtypoの心配もなくなりました。
ただ、まだnavigate('Hoge')のエラーは出たままです。先程の記事のType checking screensを見ると
To type check our screens, we need to annotate the navigation prop and the route prop received by a screen. The navigator packages in React Navigation export a generic types to define types for both the navigation and route props from the corresponding navigator.
The type takes 2 generics, the param list object we defined earlier, and the name of the current route. This allows us to type check route names and params which you're navigating using navigate, push etc. The name of the current route is necessary to type check the params in route.params and when you call setParams.
また、useNavigationをよく見てみると
useNavigation<NavigationProp<ReactNavigation.RootParamList, ...
とあるので、いい感じにジェネリクスを指定します。今回はcreateNativeStackNavigatorで
StackNavigatorを作成したのでNativeStackNavigationPropを使用します。
const navigation = useNavigation<NativeStackNavigationProp<RootStackParamList, 'Home'>>();
こうすることでエラーは消え、定義したルート名のみが指定できるようになりました。問題解決!
Bottom Tabs Navigator でヘッダーが二重に出る問題
まずはBottom Tabs Navigatorを
参考にBottom Tabsを用意します。
type TabParamList = {
  Tab1: undefined;
  Tab2: undefined;
  Tab3: undefined;
}
const TabNavigator: React.FC = () => {
  return (
    <Tab.Navigator initialRouteName="Tab1">
      <Tab.Screen name="Tab1" component={Tab1Screen} />
      <Tab.Screen name="Tab2" component={Tab2Screen} />
      <Tab.Screen name="Tab3" component={Tab3Screen} />
    </Tab.Navigator>
  )
}
// Tab1Screenなどは省略・・・
先程のホーム画面からTabNavigatorへ遷移するよう設定し、いざ遷移!
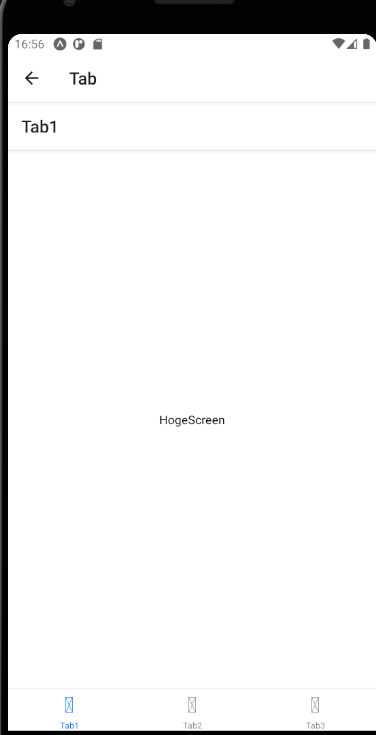
なぜかヘッダーが二重になっています。まずは下のヘッダー(タイトルがTab1の方)を消してみます。
下のヘッダー(Tab.Screen)を消す
これはTab.NavigatorのオプションでheaderShownというパラメータがあるのでそれにfalseを渡してあげるだけです。
<Tab.Navigator initialRouteName="Tab1" screenOptions={{headerShown: false}}>
上のヘッダー(TabNavigator)を消す
次に上のヘッダー(タイトルがTabの方)を消します。
先程のTab.Navigatorに渡したheaderShownは一度削除して、再びヘッダーが二重になるようにします。
ここで、TabNavigationを呼び出しているNavigationContainerの方を見てみます。
<NavigationContainer>
  <HomeStack.Navigator initialRouteName="Home">
    ...
    <HomeStack.Screen
      name="Tab"
      component={TabNavigator}
    />
  </HomeStack.Navigator>
</NavigationContainer>
HomeStack.Screenのヘッダーが表示されているので、それを消せば解決します。
先程と同様headerShownを渡します。Screenはoptionsでオプションを受け取るので注意。(NavigatorはscreenOptions)
<HomeStack.Screen
  name="Tab"
  component={TabNavigator}
  options={{
    headerShown: false
  }}
/>
これで上のヘッダーを削除することができました。ちなみに両方にheaderShown: falseを渡すとヘッダーがなくなります。当然ですね。
参考文献
Crieitは誰でも投稿できるサービスです。 是非記事の投稿をお願いします。どんな軽い内容でも投稿できます。
また、「こんな記事が読みたいけど見つからない!」という方は是非記事投稿リクエストボードへ!
こじんまりと作業ログやメモ、進捗を書き残しておきたい方はボード機能をご利用ください。
ボードとは?


コメント